The HafizeBot settings to change first are your position size and your position limit, because together they decide how much of your wallet can be at risk at once; then check that your stop-loss is switched on and sits inside your liquidation distance. Leverage (2x), isolated margin, minimum strength 2 and both directions are worth leaving alone until a week of /myresults and /lastsignals gives you a reason to change them.
This page is a setup order, not a command reference. Every command, with its full range, is in the full list of HafizeBot commands; here we say which settings matter on day one and which can wait.
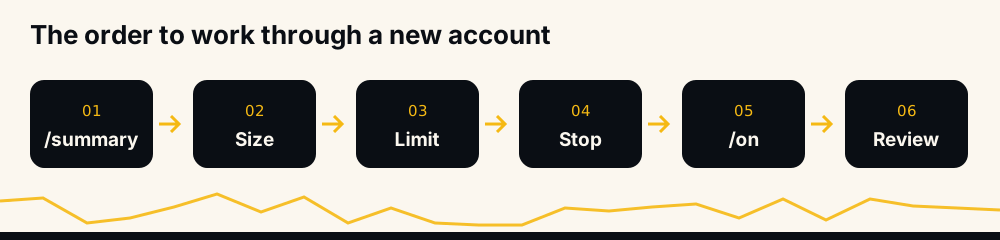
Start with /summary, not with a change
Before you change anything, send /summary to @hafizebot. It lists every auto-trading setting on your account in plain words, each with the command that changes it. /explain describes what each one does, and /setup shows which step of getting started you are still missing.
This matters because defaults apply to new accounts only. Two members can see different values without either having touched a setting.
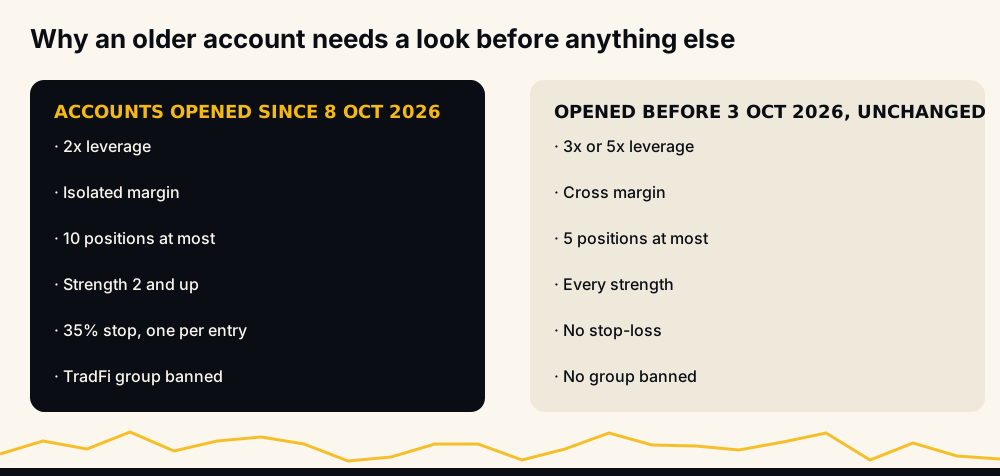
- Accounts opened since 8 October 2026 start at 25 USDT per position, 2x leverage on isolated margin, up to 10 open positions, both directions, strength 2 and up, a 35% stop-loss with one stop per entry, and the TradFi group banned.
- Accounts opened 3 to 7 October 2026 have the same values except a 25% stop and no group banned.
- Older accounts started on 3x or 5x leverage on cross margin, 5 positions, every signal strength and no stop-loss, unless the member changed them.
If your /summary shows no stop and cross margin, that is the first thing to fix, before anything in the rest of this page. The default settings help page keeps the current list.
The order to work through
Every setting, its starting value, and what we suggest on day one:
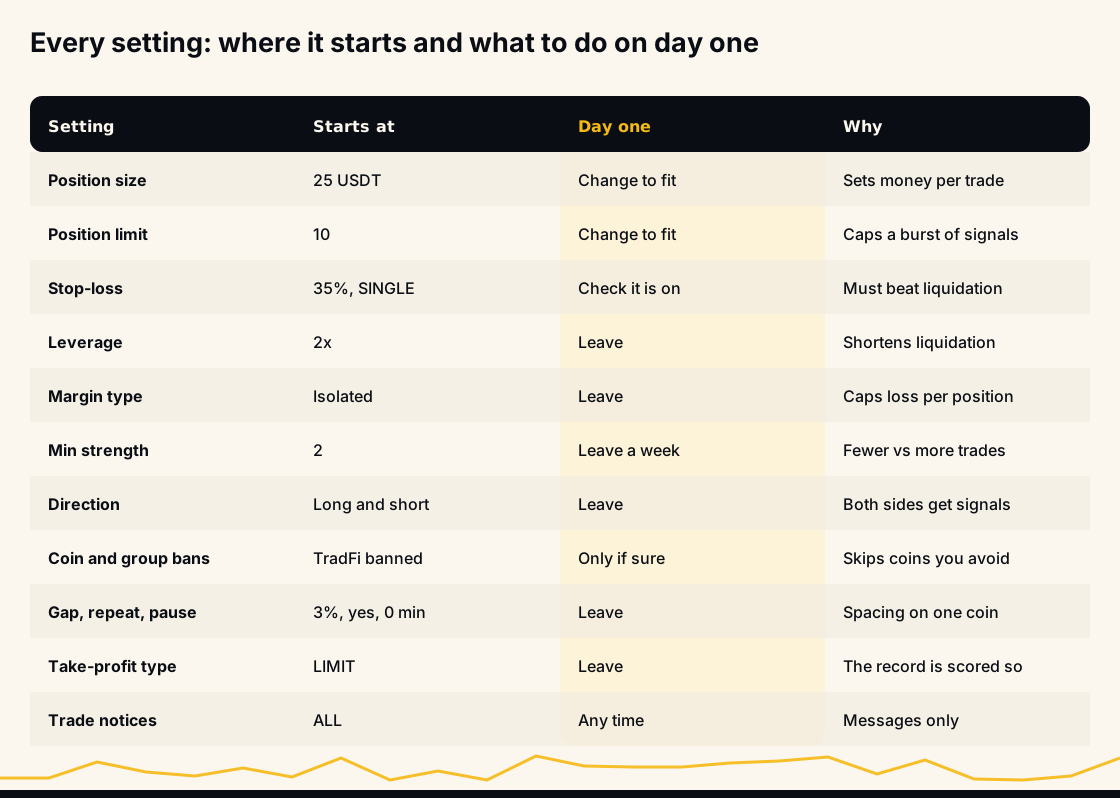
The pattern is simple: change the two settings that size your exposure to your own wallet, verify the one that protects you, and leave the settings that change which trades you take until you have seen what the bot does with your account.
1. Position size: the first number to change
/setPositionSize is the USDT of margin the bot uses for each entry. Binance opens margin times leverage, so the default 25 USDT at 2x is a 50 USDT position. Tier 1 accepts 5 to 50 USDT, Tier 2 up to 10,000 and Tier 3 up to 50,000. During the free trial each entry is capped at 10 USDT whatever you set.
It comes first because it was chosen without knowing your wallet. Choose it from the worst case: size times leverage times your stop, times the number of positions that can be open at once.
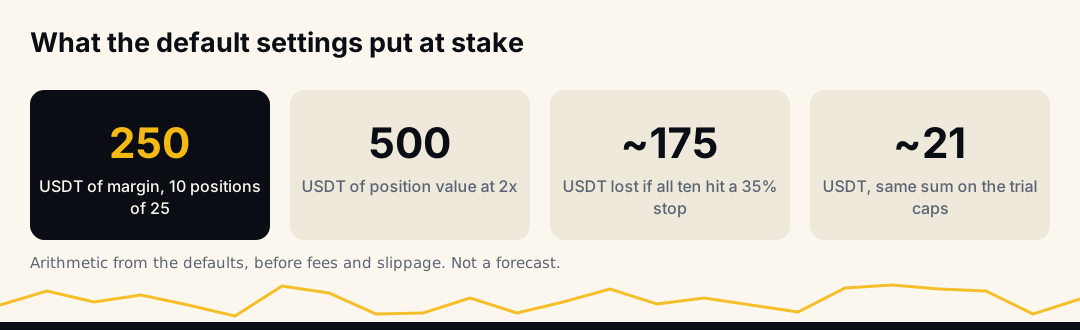
Ten positions of 25 USDT at 2x is 250 USDT of margin and 500 USDT of position value. If every one of them reached its 35% stop, the loss would be about 175 USDT, plus fees and slippage. That is arithmetic from the defaults, not a forecast; it is the number to hold up against your wallet.
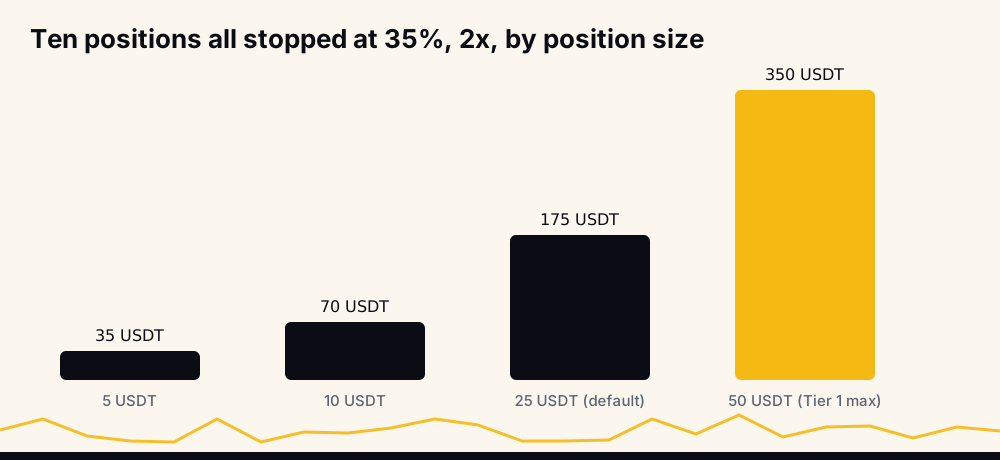
If the bar for your size would hurt, lower it before you send /on. Our article on how much money you need for crypto futures works through this for small accounts.
2. Position limit: decide how many trades can be open at once
/setPositionLimit is the most positions open at once: 1 to 10 on Tier 1, up to 100 on Tier 2 and up to 500 on Tier 3. New accounts start at 10, and the trial caps it at 3.
Signals often arrive in bursts, and the limit is what turns the size you chose into a ceiling on total exposure.
Two details catch people out:
- It counts every open position on the account, including ones you opened by hand or with another tool, not only the bot's. If you trade manually on the same account, leave room for that.
- Free margin matters too. When the futures wallet runs out of free margin, Binance refuses the order, and the bot switches auto-trading off and tells you. Our guide to the "margin is insufficient" error covers it.
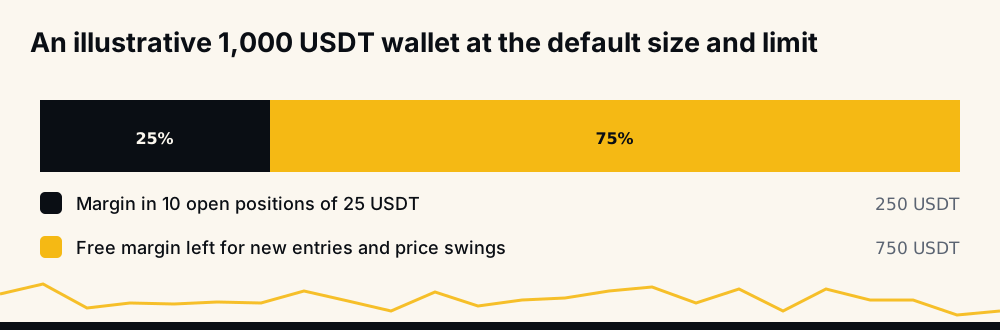
The wallet is an illustration, not a recommendation: size times limit is what the bot can tie up, and the rest is your room for new entries and for price moving against open ones.
3. Stop-loss: keep it on, and inside liquidation
/setStoploss takes 0 to 90. The number is a price move from your entry, measured without leverage, so 35 means the price moved 35% against the entry. New accounts start at 35% with the stop type SINGLE, which places one stop per entry from where that entry filled.
Check two things, not one. A stop is only placed when the percentage is above 0 and /setStopType is SINGLE or COMBINED. With OFF, or 0, no stop order exists, and a bot-opened position closes only at its target, by your hand, or by Binance liquidation. Nothing closes it when the signal expires.
A stop only protects you if it is closer than liquidation. On isolated margin the bot refuses a stop wider than about 70% of the liquidation distance and tells you the largest one that works: 35% at 2x, 14% at 5x, 7% at 10x and 3.5% at 20x. On cross margin a wider stop is saved, with a warning that it can lose more than that position's margin.
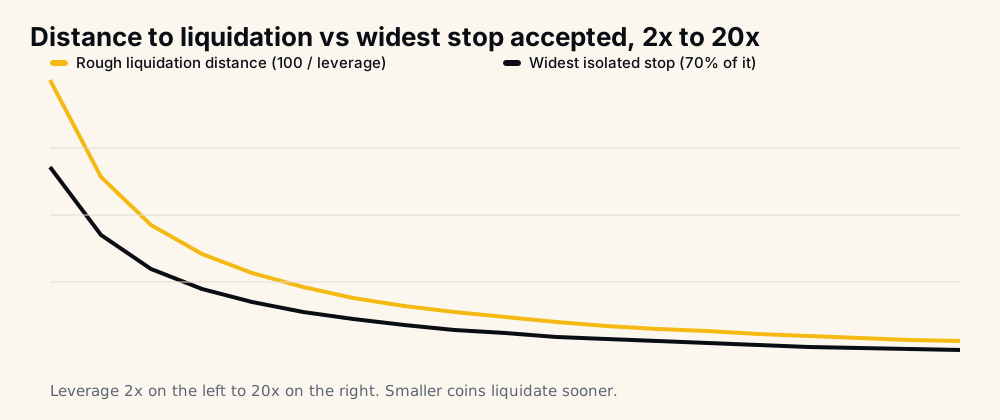
The chart uses the rough 100 divided by leverage rule. Binance liquidates sooner on smaller coins, so the real distance can be shorter; the bot checks each coin's real liquidation price when it places a stop on isolated margin and moves the stop inside it if needed. The stop-loss help page explains this, and the liquidation price calculator checks one coin at your leverage.
Whether 35% is right for you is your call. A tighter stop closes losing trades sooner and smaller; it also closes more trades that might have recovered. For the general trade-off, read how to set a stop-loss in crypto. What we do not suggest is running without one.
4. Leverage: leave 2x until you have a reason
/setLeverage takes 1 to 20 on every tier; new accounts start at 2. We put it in the "leave" column because raising it changes two things at once: more position value per USDT of margin, and a shorter distance to liquidation. The help page on liquidation lists rough distances: about 30% at 3x, 20% at 5x, 10% at 10x and 5% at 20x.
If you do raise it later, change the stop first. When you change leverage the bot re-checks your stop, and on isolated margin it refuses a leverage that would leave your current stop beyond the new liquidation price. Tighten /setStoploss to fit, then raise /setLeverage.
If the aim is more money per trade, a larger size at the same leverage keeps the liquidation distance where it was. Our guides to how leverage trading works and to Binance futures leverage limits go further.
5. Margin type: leave it on isolated
/setMarginType takes ISOLATED or CROSSED. New accounts start on ISOLATED, and it is the one we suggest keeping.
On isolated margin a single position can never lose more than its own margin, even if its stop fails. On cross margin it can draw on the whole futures balance.
One exception: if Binance reports your account in Multi-Assets mode, the bot enters on cross whatever this setting says. If your positions open as cross and you did not choose that, read what Binance Multi-Assets mode is and how to turn it off.
6. Minimum strength and direction: leave them for a week
/setMinStrength sets the lowest signal strength the bot will trade, from 0 to 5. New accounts start at 2; 0 takes every signal. A higher minimum means fewer, pickier entries. According to the signal strength help page, in the published archive higher-strength signals reached their target slightly more often but were far rarer.
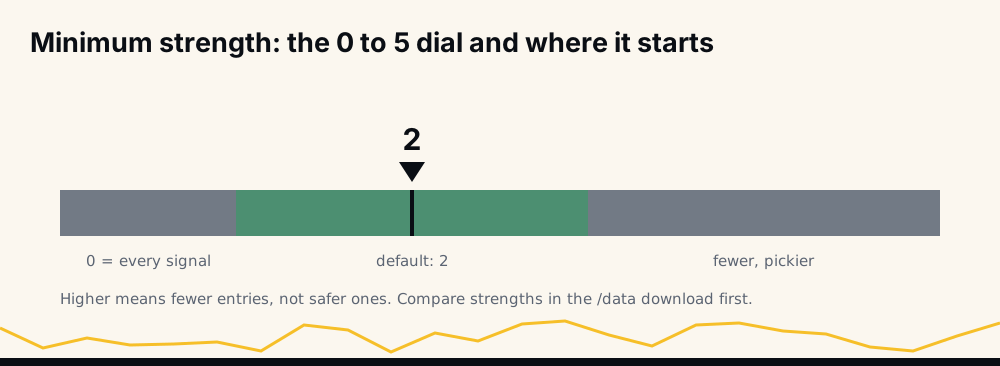
There is no right value for everyone, which is why we suggest a week at the default before touching it. If you want to compare first, the signal dataset has a strength column for every signal from June 2021 to February 2024.
/setPositionSide takes LONGONLY, SHORTONLY or BOTH (the default). Restricting it means skipping every signal on the other side. Unless you have a firm reason, leave BOTH; the PositionSide guide explains the Binance mode it is often confused with.
7. Coin bans and groups: change only what you are sure of
Bans decide which coins the bot will never trade, whatever the signal.
/banCoin SYMBOLblocks one coin on any plan, for example a coin you already hold elsewhere or simply do not want./banGroupand/unbanGroup, on Tier 2 and up, block or allow a whole Binance group such as Meme or Layer-2. New accounts start with TradFi (tokenized stocks, commodities and indices) banned; to trade those, Binance also asks you to sign its TradFi-Perps agreement./banlistshows everything blocked, coins, signal types and groups together.
Ban what you know you do not want, and stop there: every ban removes signals. The ban coins help page lists the groups.
8. Repeat entries, the same-coin gap and the coin pause
These three control how the bot behaves on a coin you already hold, or have just closed. All three can stay at their defaults for the first week.
/allowRepeatingSignals: whether a new signal on a coin you hold may add another entry. Yes by default; no means one position per coin until it closes./setSameCoinGap(also/setDifference): how far price must have moved past your last entry before another one on that coin, 3% by default. The bot only adds when a new signal fires; it never averages down on its own./setCoinPause: minutes to wait after a position on a coin closes before entering it again, 0 to 1440. The default 0 means no pause.
If the bot stacks more entries on one coin than you like, adjust these. The help pages on repeating signals and the same-coin gap have worked examples.
9. Take-profit type and trade notices
/setTakeProfitType takes LIMIT (the default) or TRAILING. LIMIT is a reduce-only limit order at the signal's target. TRAILING only starts working once price moves beyond the target, so a signal that just touches its target leaves the position open with no take-profit working. The public record is scored the LIMIT way, and no results are published for trailing, so keep LIMIT unless you have a reason. /combineTakeProfits, on by default, closes repeat entries on a coin together at one take-profit. The limit or trailing help page compares the two.
/setTradeNotices is the one setting you can change freely on day one, because it changes messages, not trading. ALL (the default) sends a message for every fill, CLOSES only for fills that close or cut a position, and OFF sends none.
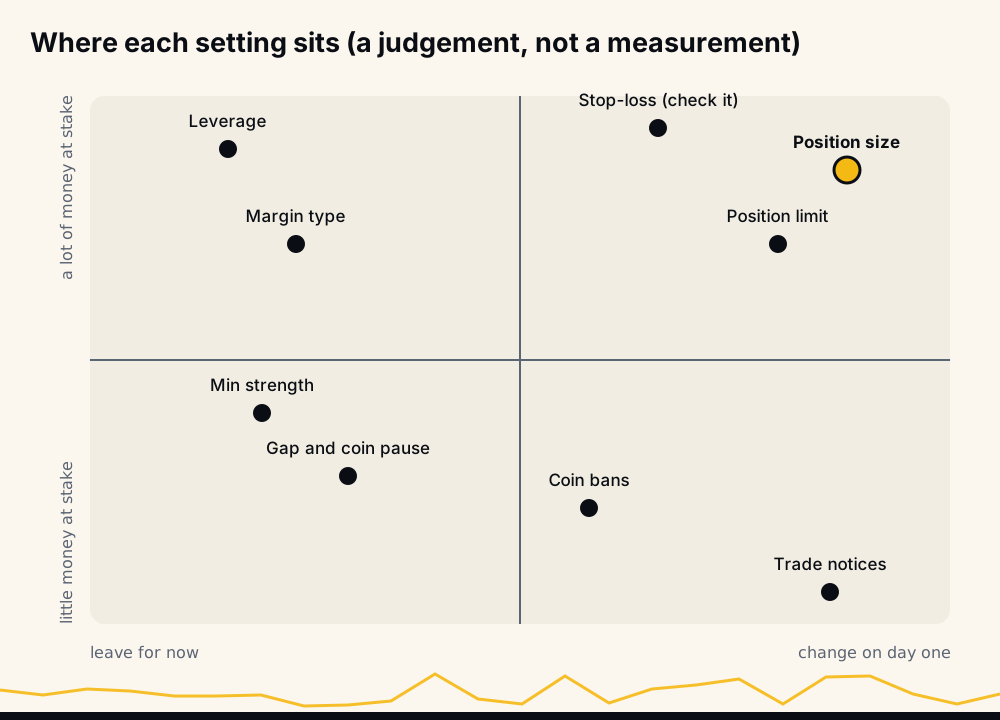
The map is our judgement, not a measured effect.
What to check after one week
Once you have sent /on, the useful habit is to change nothing for a few days and watch.
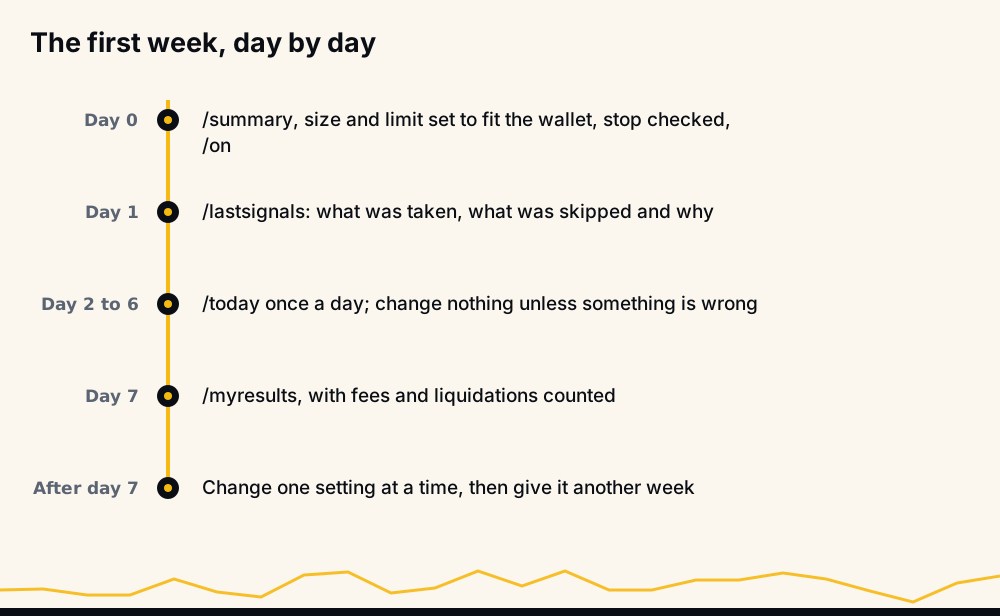
/lastsignalslists your ten most recent signals, what the bot did with each, and the reason for every skip./lastsignals enteredshows only the trades it opened. Send it first whenever something surprises you./todayshows what the bot did on your account in the last 24 hours./myresultsshows what the bot's own orders did on your Binance account over the last 30 days: closed trades, their result, fees, liquidations, and the net with liquidations counted against the bot. Trades you placed yourself are left out.
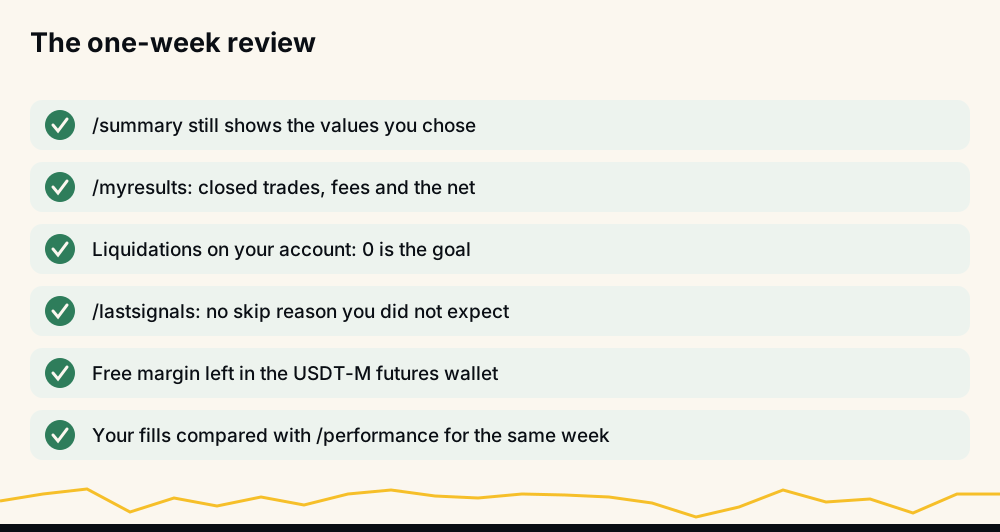
Then compare your week with the live performance page, which scores every signal and counts expired ones against the hit rate. Your fills will not match it trade for trade, because your size, limit, bans and stop differ from the record's assumptions; the point is to understand the gap, not to expect none.
After the review, change one setting at a time and give it another week, so you know which change made the difference. If the bot stopped taking trades altogether, the bot is not trading checklist goes through the causes in order.
What a week cannot tell you
A week shows whether your settings do what you meant. It is not enough to judge results: signal frequency depends on the market, and a handful of trades says little either way.
For a longer view, the /performance page is rebuilt hourly from the trade database, and the monthly reports cover June 2021 to February 2024. If you want to watch signals before paying at all, the free signal channel posts the same signals 20 minutes later.
None of this is investment advice. Futures trading carries a high risk of loss, settings change how much you can lose rather than whether you can, and you should only trade what you can afford to lose.
FAQ
What HafizeBot settings should I change first?
Position size and position limit, so that the worst case (size times leverage times stop, times the number of open positions) fits your wallet. Then confirm with /summary that the stop-loss is above 0 and the stop type is SINGLE or COMBINED. Leave leverage, margin type and minimum strength at their defaults for the first week.
What are the default HafizeBot settings?
Accounts opened since 8 October 2026 start at 25 USDT per position, 2x leverage on isolated margin, 10 open positions, both directions, strength 2 and up, and a 35% stop-loss, one stop per entry. Older accounts may differ; /summary shows yours.
Should I raise leverage on HafizeBot? Not before you have a reason from your own results. Higher leverage shortens the distance to liquidation, and on isolated margin the bot refuses a leverage that would leave your stop beyond it, so tighten the stop first. If you want more money per trade, raising the position size keeps the liquidation distance unchanged.
Why did the bot not take a signal after I changed my settings?
Send /lastsignals; it gives the reason for each recent signal. The usual causes are a strength below your minimum, a banned coin or group, a full position limit, the same-coin gap or the coin pause, or too little free margin in the futures wallet.
How do I know if my settings are working?
After a week, send /myresults for the bot's own trades over the last 30 days, with fees and liquidations counted, and /lastsignals to check that no skip reason surprises you. Compare that with the performance page for the same period.
Where to go next
Send /summary, then work through size, limit and stop before /on. Any command not on this page is in the full list of HafizeBot commands. If you have not connected Binance yet, start with connecting a trading bot to Binance safely: the key cannot withdraw, and your funds stay on your own account. And if you ever want the bot to stop, /off opens no new trades and leaves open positions as they are; what happens to open positions if the bot stops explains what to do with them.